*SculptView Help*
by Stanko Juzbasic
This document is published under GNU FDL

Contents:

It's a little visualization, interactive editing, signal-modeling resynthesis and algorithmic composition score generating utility, using partial tracking analisys files saved in text format. This is its second, not yot complete release, and so is this help file. It is a free program, you have freedom of using it at your own satisfaction, risk and responsability, including freedom of understanding what you're doing. It comes with absolutely no warranty of any kind.
Many things, such as:
Version 0.89bx, which starts the new development cycle,
being tested in OSX 10.6 - 10.14 (Intel), as well as in macOS 15.5 (Apple Silicon) For bug fixing and improving this page your feedback is most welcome.
Versions 0.89x are covered by this
preliminary help-file. For previous versions,
up to 0.7x, please consult the
legacy help file.
Any Intel-macOS based workstation running 10.6 - 15.5, as of version 0.8x., as well as natively on
Apple Silicon based workstations, as of v. 0.89b5.
Its prototype had been devised on an SGI O2 - IRIX-6.5 and used to run on any UNIX-like system.
As of versions 0.8x, the "X-11 window" (a generic window system for UNIX) support had to be dropped,
in favor of GLUT, which works better and is 100% portable.
All the processing and audio synthesis (except for live playback) is written in plain-C language, and there are no "hidden
requirements" for commercial software libraries. Live playback is handled by
CoreAudio for the current
version because it's robust and easy to debug, but in some future versions a platform independent live-audio solution will also be sought after.
Which are additional hardware requirements?
You need a plain THREE-BUTTON USB MOUSE
to make the program work properly.
In the ScupltView > Preferences menu: the "Three Button Mouse
Emulation" option has to be turned off, since you're working with a real three-button mouse.
Newer MacBok Pros also make use of two-finger clicks as right-clicks, while <control>, <option>
and <shift> modifier keys do what they are supposed to.
For audio playback SculptView can use the built-in audio as well as any external audio hardware.
Which are software recommendations?
As SculptView largely uses SDIF (Sound Description Interchange Format) it is recommended to download the Open Source SDIF Library, compile and install it.
If you run the pre-built binary, which is the case so far, just copy it anywhere you want it.
Two "standard" places would be:
/usr/local/bin
to make it available to anyone on the computer
~/Applications/bin
to make it available just within your account
Just make sure to include PATH to those directories in the shell defaults.
This version has to be started:
> Sculptview [path/infilename] -[options]
-Infile has to be in the format of IRCAM's "Partials Tracking Text Files", which are generated by AudioSculpt or by ceres3 programs, SPEAR partial tracking files, as well as SDIF files (either harmonic partials, inharmonic partials or fundamentals) in plain text format.
To whom can this program be useful
If you are kind of intermediate-level computer music practitioner / sound designer, the
concepts of additive synthesis, phase-vocoding and algorithmic
composition should ring a bell. If you need free a visualization / sonification tool for partials in the
education process, this can make sense to you.
If you're a student and like to study yourself, likewise.
If you are already familiar with IRCAM's Audiosculpt and Diphone, and
Columbia CMC's RTcmix, SculptView can be an extra tool for you. If you
are affiliated with Columbia University CMC or a member in
Forum IRCAM's Sound Design
Group, than you are at home. Apart from that, there's just a few more
theoretical basics worth taking into account.
How much technical knowledge must one have?
Since this is not a consumer market program, it's not even a marketed program,
it can't be
expected to behave like a common consumer-grade product.
Let's
assume you'd try it because you already know something and would like to know
some more, or would like to help someone learn something, or share some of your knowledge
with someone.
No special computer skills are required, other than knowing that there is a computer
operating system called UNIX, being around for almost 50 years, and this is one of its
flavors. SculptView can take
basic commands through a text input interface called "shell", which resides in
an application program called "Terminal.app".
Understanding of this basic concept (such as knowing that terms "folder" and "directory"
mean the same and are interchangeable) and being
familiar with few essential and easy shell commands is recommended, because it will help you work
with SculptView.
Having taken a few Electroacoustics or Music Theory classes, or having read few such books
is also welcome.
A few mathematical theories of musical tone, dating back to the
19th century teach that musical tones can be decomposed into sets of
primitive contours made of sine waves, simultanously independent but
co-related (however, there are also other theories, which teach it does not really work).
Their qualities (time, frequency, loudness or amplitude) partially contribute to the
overall qualities of tones (pitch, timbre, integrity, sonority), so they are
called partials, and their properties are called partial frequencies
and partial amplitudes. A partial in itself technically, is an
enveloped sine wave. A sine wave is the simplest concept of tone,
which cannot be decomposed to something simpler, smoother and more primitive. It sounds
dull and resembles to the sound of a tuning fork. An envelope is
a contour, tracking the development of frequency and loudness over
time. A partials' tracking file is a text file which stores
descriptions of these envelopes. It can be generated by, and exported
from few other audio analysis computer programs, such as AudioSculpt, SPEAR, SonicVisualizer, FHTCore
and Ceres3. Unfortunately, neither of those programs can
quite satisfyingly edit them, and here's where SculptView can help. If you
take a look at the left image you will see a sonogram showing dark
spots in the areas of intense spectral activity of a sound, while the
right one shows the lines connecting peaks of spectral activity of the
same sound. Those lines can be then exported as partials.
_
FFT sonogram and partials' tracking of a tabla tone in IRCAM's AudioSculpt
Where's the difference between FFTs and partials?
F(ast) F(ourier) T(ransform) is a method of analyzing, filtering and resynthesizing spectral contents of any digitally recorded signal. As useful as it is in the field of "artifact-free" sound design (cross-synthesis, de-noising, reverberation, data compression, phase-vocoding etc...), FFT files represent raw data of spectral activity (another program which I maintain, Ceres3 also deals with this issue). Being pretty huge, "monotonous", and tiring for a human to read, FFT files don't represent quite an appealing format for generating computer music scores. One possible cunning to get around the problem is in finding a way to abstract parts of information, which do not seem important to a composer (or perhaps a sound designer), and re-arrange data which make sense in a more appealing order, as partials in this case. They represent a higher level of abstraction: as hierarchically structured text files they posess a useful duality of:
( PARTIALS 4
( POINTS 66
0.023 107.483
4.905
0.029 106.906
6.393
0.035 106.892
7.218
... ...
... ...
0.401 161.814
-10.837
)
( POINTS 43
0.023 317.816
-0.924
0.029 320.954
0.352
0.035 322.549
1.272
... ...
... ...
0.267 387.598
-15.703
)
( POINTS 34
0.023 409.369
-3.463
0.029 422.257
-2.888
0.035 427.591
-2.146
... ...
... ...
0.215 484.361
-13.998
)
( POINTS 22
0.058 226.494
-8.304
0.064 226.317
-7.738
0.070 220.751
-5.203
... ...
... ...
0.180 250.804
-4.006
)
)
(Dotted lines save some space for this example - not to write the
entire file - which can also be pretty long)
Please observe this is actually a LISP list. It was originally implemented for data export
to IRCAM's algorithmic composition environments PatchWork and OpenMusic.
As the file itself looks pretty much like a parameter list for an oscillator bank score
file or for a visualisation file, it is almost ready to be used as such.
Yet, editing such a file and understanding what it sonically and musically really means,
can become a time-consuming mess. One could imagine a partial
being a weightless string,
tightly suspended through its breakpoints. This is
where visualization can really help.
Such a file looks in SculptView pretty much as described. Opening files is
explained in the passages to follow:

Interface concepts
Program interface consists of:
Example:
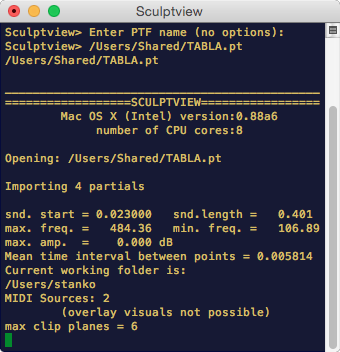
Open the shell window by launching the Terminal.app
(Assuming that you 'cd'-ed to the folder where example file TABLA.pt and ScupltView program
are located)
> Sculptview TABLA.pt
Same can be achieved by double clicking the program's icon and drag-dropping the partial tracking file's icon into the open shell window, as shown:
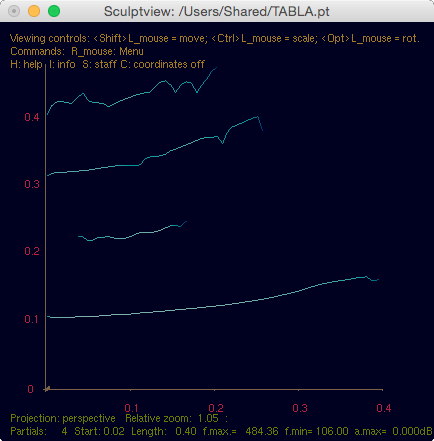
The file promptly opens in an interactive visualization
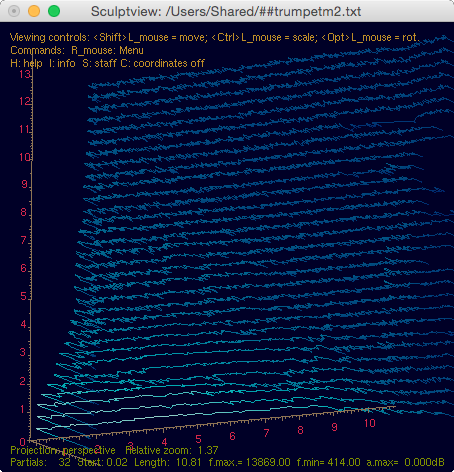
window, which looks intuitive: time is left to right, frequency is low to high,
loudness is far to near.
If starting from the Terminal.app, you can also give the program few optional arguments. They have to be preceded by a - (minus)
sign and they tell the program how the file should be displayed:
> Sculptview [infile] -[options]
Navigating the interactive visualization window
The mouse you use has to be a straightforward three-button USB mouse, no magic mouse, mighty mouse, trackpad, etc. Most of the interactive functionality is being obtaind by program-defined custom combinations of mouse-clicks and modifier keys, such as:
shift+Left mouse button moves (repositions) the image in the window.
ctrl+Left mouse (not right mouse!) button zooms in and out.
option+Left mouse button rotates the visualization image.
The window can be also resized (reconfigured) by the window manager (that is dragging, repositioning and resizing the frame around the window. All values and interface parameters will be recomputed automatically. Please observe the interactive coordinates, info and help text. It can be on/off-toggled by pressing C, I and H keys.
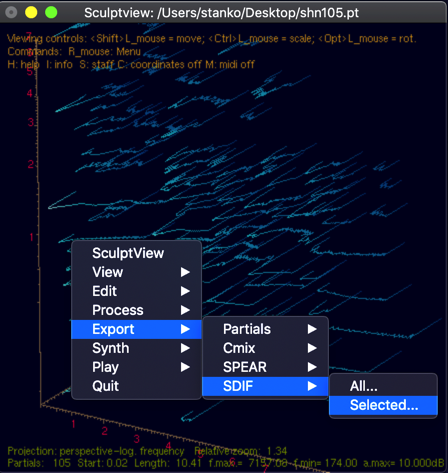
If you press and hold the right mouse button over the visualization window, a hierarchical pop-up menu will open showing a number of commands organized into sub-menus:
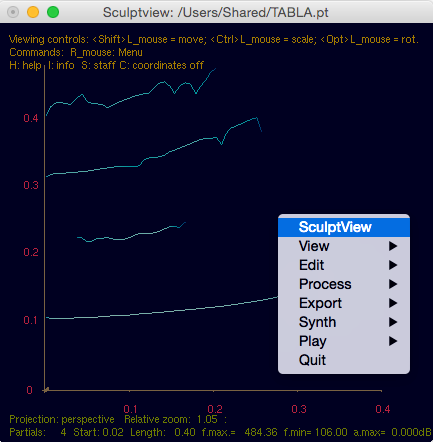
If you choose Log Freq from the View menu, the display will change into something like this:
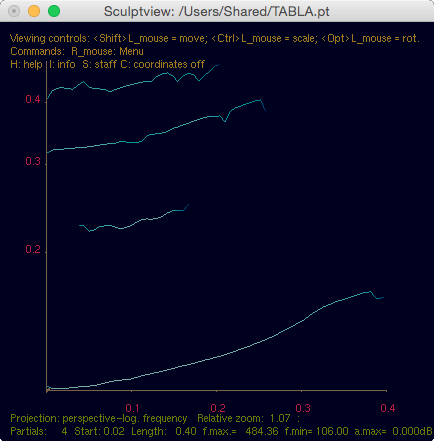
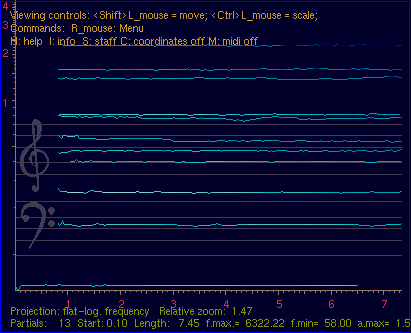
The partials will be displayed logarithmically, i.e. vertical intervals among partials will look alike the way they are heared. One can clearly recognize the visual intervals corresponding to an octave, fifth and fourth - fundamental plus first three overtones. Please also observe that vertical axis display will change, showing nothing between zero-frequency and the lowest frequency in the lowest partial.
Tip: Observe the interactive text fields in the visualisation window. Upper field is the help text on available tools and top-level commands. Lower field consists of useful info on the state of the window and data you work with.
Selecting and editing partials
If you choose Breakpoints and Flat from the View menu, the program enters the editing mode (no editing is possible outside this mode). It would be the same as starting the program with the -bfl (l stands for logarithmic view, which is displayed, but not necessary for entering the Editing mode) options from the command line, i.e:
> Sculptview TABLA.pt -bfl
The display changes from the perspective 3-D view into a two-dimensional orthographic projection, showing the actual breakpoints in small red dots:
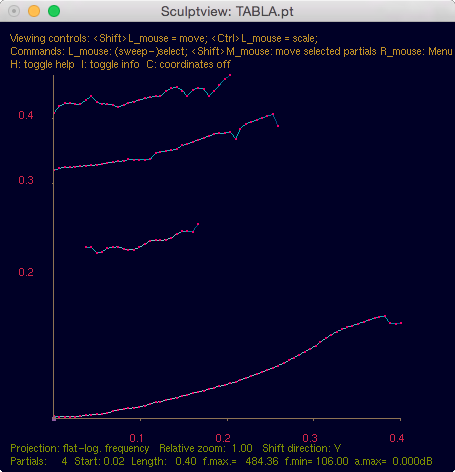
Pressing the ">" key will make the dots bigger, "<" will make them smaller. Zooming-in (control-key+left mouse button) also adapts breakpoint size. Observe the info text and coordinates updating interactively.
In the Editing mode the left mouse button becomes a tool for selection. Please, observe the help text updating interactively.
There are two types of selection for all operations in SculptView:
They serve for different purposes and here is how they work:
By clicking the left mouse button near the breakpoint it gets yellow-selected. Up to two different points can be selected in this way. Deselection is made by pressing the delete key
By sweeping (dragging) the left mouse button across a diagonal area, any enclosed breakpoints will get green-selected. As many breakpoints as available can be selected this way: They can be grouped into different areas. As long as you don't deselect (by pressing control+delete), previous selections are remembered and added to.
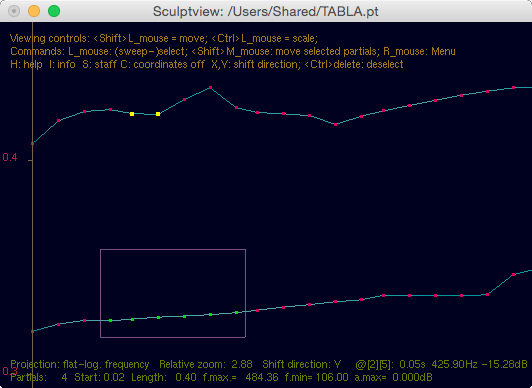
Please observe the different color of the breakpoints , with respect to how the selection was made. Different kind of selection is needed for different treatments of partials.
You can choose any item from the edit menu to edit partials. However,
the program always makes a pre-check to find out if your selection
makes sense for the operation you choose to perform, and will warn you
through the shell message if not so. For details please
consult the Quick Reference paragraph of this help page.
Deselecting and extending selections
In the Editing Mode, pressing the delete key on the keyboard deselects both yellow
breakpoints, by pressing the option+delete combination, only the earlier
selected point gets deselected, by pressing the shift+delete combination, only the later
selected point gets deselected, by pressing the control+delete
all green and yellow breakpoints
get deselected. By option-sweeping (dragging) the left mouse button across a diagonal area,
any enclosed green-selected breakpoints will get deselected. They change their color back to red.
Only group (green) selections can be extended by using the Select
sub-menu items from the Edit menu and corresponding keyboard shortcuts. Please feel free to
explore what each of them does.

All menus which include a sub-menu have an arrow pointing to the right next to its name. All menus whose name includes an ellipsis (...) will require you to enter additional information (such as a file name, or a parameter value into the program's shell (terminal) window. The shell always prompts you about what the program asks for and tells how to do it.
View
Edit
Process
Export
Commands of this menu will let you save your work in any of the
following formats:
Synth
The program uses floating-point precision oscillator bank
synthesizer to synthesize the partials into an AIFF file. The
oscillator bank synthesis is very "processor hungry", so it's taking advantage
of parallel processing and will run on as many CPU cores as found in a particular
computer. If you hold the Control key while selecting the
Synth menu command, a debug oscillator
engine will be selected, which is slower, but can fix few nasty bugs in IRCAM analysis files.
Play
The program uses the same floating-point precision oscillator bank
synthesizer to render the partials directly to computer's default sound out.
A green vertical cursor beam will follow playback. In 3D visualisation mode it will turn into a
time-moving plane, intersecting partials at playback points.
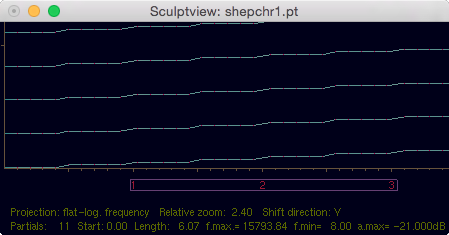
Click-dragging mouse left button marks the desired time segment, much like sweep-selecting.
By doing so below the time axis, no partials shall get selected, only the time zone will get marked for playback.
Quit
Main Menu

Mouse:
In 3D screen-mode:
In Editing screen-mode:
Please also observe that automatic checking against violating time-boundaries is not yet implemented. So you can easily make time values go back and forth, which would render partials impossible to synthesize. It will be fixed in a future release.
In Editing screen-mode the middle mouse button (while holding the option-key) controls live scrub-playback, if you click while pointing inside the active area of the interactive visualization window . The time slice of the partials will be rendered and played from the default audio output (see advanced paragraph of this text).
Keyboard Commands:
C, s, I and H keys toggle on and off the on-screen display of Coordinates, Staff lines, Info and Help text, respectively.
Pressing S in logarithmic display mode toggles adding bass and treble clefs to Staff lines, for easier orientation.Pressing V key toggles on and off the shell verbous output (=pedantic information).
Pressing G key raises live playback gain in 1.5 dB steps.
Pressing g key lowers live playback gain in 1.5 dB steps.
Pressing F key raises amplitude floor threshold in 3 dB steps.
Pressing f key lowers amplitude floor threshold in 3 dB steps.
Pressing <option>+f key resets amplitude floor threshold to -90dB.Pressing M key enables MIDI input.
Pressing W key enables mod-wheel MIDI selection of partials.
Pressing = and -
keys in Edit-mode will amplify/attenuate either individual-selected or group-selected
breakpoints.
Pressing same keys while holding "option" will expand/compress all amplitudes below floor threshold, while leaving amplitudes above it as they are.
Pressing 1, 2
and 3 keys will set the amp change step to 1, 2 or 3 dB.
Pressing same keys while holding "option" will set the amp change step to
1, 1/2 and 1/3 dB. Default value is 0dB (=no change!).
Pressing > key in Edit-mode makes breakpoints look bigger.
Pressing < key in Edit-mode makes breakpoints look smaller.
Group-selection keyboard shortcuts:
Pressing Delete (not backspace!!) deselects all individual (yellow breakpoints) selections.
Pressing Option+Delete deselects older of the two individual selections and retain the newer.
Pressing Shift+Delete deselects newer of the two individual selections and retain the older.
Pressing Control+Delete deselects all active selections (individual and groupwise), equivalent to Select None menu command.
Playback keyboard comands:
Pressing Shift+Space synthesizes and plays all partials, equivalent to the Play > All menu command.Pressing Option+Space synthesizes and plays group-selections, equivalent to the Play > Selected menu command.
Pressing Space while playing pauses playback.
Pressing Enter while playing stops playback.
Pressing Space while paused resumes playback.
Pressing Space otherwise re-plays what's already been played. If nothing has been played, nothing will be re-played.
Pressing : toggles loop-playback of the above commands.
Pressing Z live-synthesizes and plays the zone between two time values (it has to be marked as described in the Menu reference).
Pressing Option+Z only plays the group-selections within the zone between two time values. If nothing is selected time interval of silence will get synthesized.
Pressing Escape will suspend the program, and its terminal window will ask
for the standard UNIX shell you want to use, once you complete the shell command, write
"exit", press Enter, the UNIX shell will quit and the program will resume.

When a menu item ending with (...) is selected, the program needs additional text options. This is done by typing the required text into the Terminal window, as instructed by the shell prompt. The interactive visualisation window will be put on hold until this is done.

Using arrow keys...
Using X & Y keys...
Pressing these keys will enable the horizontal and vertical shifting of either individually selected (yellow) or group-selected (green) breakpoints in respective directions (see mouse reference). As time boundaries to the next non-selected breakpoint in X-direction are not being checked for group-selected breakpoints so far, it may yield unpredictable and meaningless results. Please observe the info text on the interactive screen!
Using lin & log screen view...
Apart from visual convenience linear and logarithmic view determine how the partials can be drag-shifted in the Y-direction.
Arbitrary live resynthesis (scrub) playback:
Using SDIF files...
If you're using AudioSculpt v.2.0 upwards, the "lisp-list" form of
partial tracking files
export is dropped in favor of adopting a more universal Sound Description Interchange Format
(SDIF), which has become native AudioSculpt format for storing all the analysis and treatment
data.
Unfortunately, these files are being saved in binary format, while
SculptView is meant to deal only with human-readable data files, written in
text format.
Therefore you have to use the sdiftotext utility, in order to convert such
files into text format.
This utility is part of Open Source SDIF library and can be
downloaded from
Sourceforge
SculptView will automatically determine if the file describes partials
or fundamental tracking data, import it and render it.
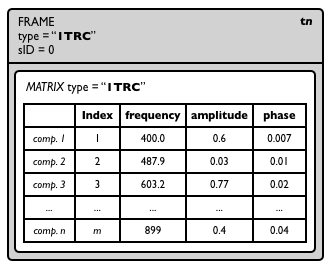
Here's IRCAM's illustration of the structure of an SDIF partials' file, for a time-frame tn:
Using SPEAR files...
In his PhD thesis "Spectral Analysis, Editing and Resynthesis" and in his program
SPEAR, Michael Klingbeil inaugurates few new analysis formats, one of which
is the "Text-Partials" format, currently very much used. It is basically follows the format of the traditional LISP
list, but parentheses free, with few differently placed "strategic" keywords. They are completely interchangeable
with one another and SculptView can use both for reading and for writing data. If you do the sound analysis in
SPEAR, just make sure this export option is selected instead of "Text-Resampled Frames",
which is SPEAR's default.
Interactive reading of unstructured text documents:
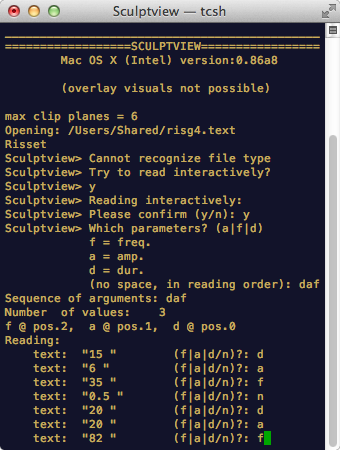
This is a feature-in-development, which allows for selectively reading partials'
frequencies, amplitudes and/or durations from normal unstructured plain text files. A number of historic research works
published tables of partial frequencies for certain sounds (bells, etc.). One can also selectively
retreive such information from practically any text file, including computer music score files.
SculptView can selectively scan through such text files and ask which data to import, which to
discard. You only have to decide which is the reading order, such as, amplitudes, frequencies,
durations. You have to enter these "shortcuts" as one word, no space in between characters,
ex.: daf
Although SculptView will do its best to zap non-numeric characters and gremlins, there
may still be values which don't make part of your choice, such as day times, years, street numbers or whatsoever. You
can discard them by pressing the 'n' key when they appear. If you've read all you needed, you
can stop reading by pressing the '/ ' key.
Example:
Start the program and give it the name of such a file as argument, the
shell will guide you through the process.
Harmonizing the partials:
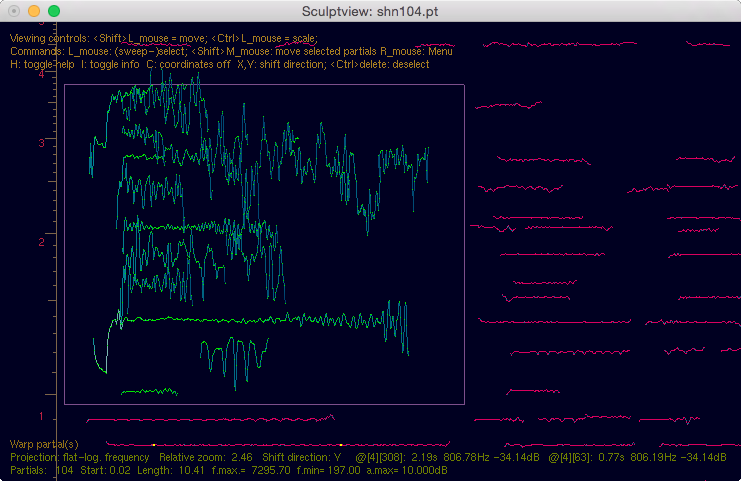
This is another feature-in-development, which allows for "fine-tuning" of
selected
target partial(s) to a selected
source partial.
How to do it:
Envelope follower:
Similar paradigm can be applied to model the amplitude envelope of the target partial
after the envelope of the source partial. Just yellow-select
two points of the source partial and green-select target partials
or their sections and press option+down key and watch and listen what's happening.
Do not repeat it twice on the same target-partial and use this experimental feature sparingly and carefully.
It is not reversible.

1. Visualization: As OpenGL (the computer "library" for graphics) is platform independent, there should be no visualization issues. It is lightweight and fast. However, the way OpenGL interacts with window manager programs of a particular OS is implementation-dependent and may bring both pleasant and unpleasant surprises. Popup menues, which in IRIX use an overlay plane, used to behave somewhat oddly on Linux boxes using particular graphic cards. This native MacOSX port using GLUT (Graphics Library Utility Toolkit - a widely available standard programmer's interface) renders the popup menu in system-designated overlay plane causing no glitches and bumpy delayed redraws. It's taken care of by the System, not by the program.
2. XWindow dropped: In MacOSX, the poor interaction between OpenGL and X11 was hindering further development of SculptView. Current visualization, built on GLUT library is fast, reliable and portable. It's neither GUI-compatible, nor source compatible with earlier versions of the program, but is as portable as GLUT is. It bypasses the X11 and interacts natively with Apple's Aqua window manager, still behaving like a traditional UNIX app. Although it can be double-clicked to start, it's simpler to start it from Terminal.app instead, as described above.
3. Performance: This is *not* a virtual musical instrument or a real-time performance program, although in some future version it may develop in this direction. So far it's easier to synth the score files/sound samples, and use them in a proven real-time computer music environment, such as RTcmix, SuperCollider, CSound, PD (free, academic) or Max/MSP, Live, Kontakt, etc... (commercial). Nevertheless, complete oscillator-bank resynthesis engine, written from scratch and unlikely to be found elsewhere, is included will furtherly extend. The author used this program as tool for synthesizing the Temple Bells' sound in successful productions of Richard Wagner's "Parsifal" and Giacomo Puccini's Tosca in a major European opera theater.
4. Simplicity: As the author can afford maintaining and updating the program only occasionally, it is
of vital imporance that it relies on as few external resourcesas as possible.
Therefore it will never look fancy and chic. Hope to have your understanding.
5. Real-time audio: As of version 0.85 CoreAudio support for playback has been introduced. Although it breaks platform independence for so far, several advantages can be weighed against it.
7. Features: This is only a partly finished work in progress. Feature suggestions are very welcome.
8. Bugs: A bug may cause the app crash after long repeated successive arbitrary splitting and joining partials. Therefore, occasionally exporting partials can prevent losing some good work.
9. No undo/redo so far: All the partials' based editing and processing is so heterogenous and complex that an elegant undo/redo functionality must be written from scratch. Therefore it can't get conceived before the program is functionally complete. It is advised to occasionally export (=save) your intermediate work, for so far.
Here's the same help file in Croatian, although I wouldn't dare to recommend it as entry lesson for learning the language...

Credits (v.0.7 and up)
Ministry of Science
and Education of the Republic of Croatia, for initial project
support.
Columbia University
Computer Music Center, for facilitaing the LINUX port.
Croatian Academy of
Sciences and Arts, for partial project support.
Republic of Croatia Ministry of Culture and Media,
for partial project support.
Xavier Rodet, for few SDIF related clarifications.
John Gibson, for help with RTcmix v.4.x. export.
Mark J. Kilgard, for clarifying few GLUT internals.
Douglas Scott, for CoreAudio advice.
SculptView is written in plain C language and consists of approx. 22000 lines of source code.
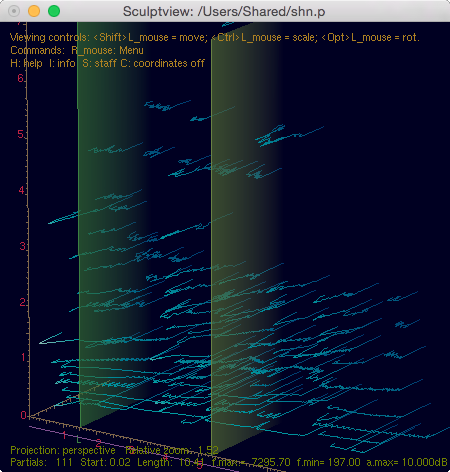
Few more screenshots...
...and the new ScluptView Download page