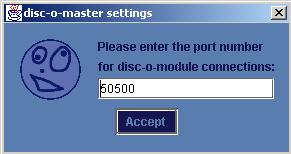
The first thing you'll see when you run disc-o-master is the port selection dialog box. This number is important, because you'll need it later when you want the sound and image applications to connect to the server. The default value, 50500, is usually fine.
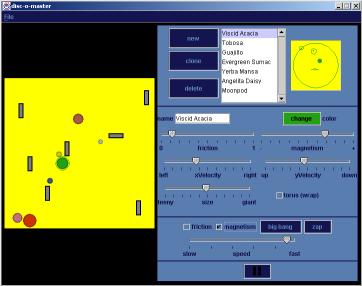
Next you'll see the main interface. There are four main sections of the interface. We'll look at each one in turn.
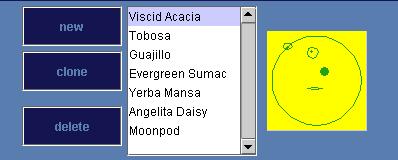
This is the disc maker section. Use it to create and remove discs. You can also draw a face for each one! There are several controls:
new:
Press this button to make a new disc with random settings.
clone:
Press this button to make a copy of the currently selected disc.
delete:
Press this button to delete the currently selected disc.
disc list:
This list shows you the names of all current discs. You can select any
disc by clicking on it. When you select a disc you'll see its information
displayed in the disc control panel below. The disc will also be outlined on the screen by an extra circle.
face maker:
Each disc gets its own face! A crazy face is created for you when you
make a new disc, but you can create your own if you want. Just draw on
the image with your mouse.
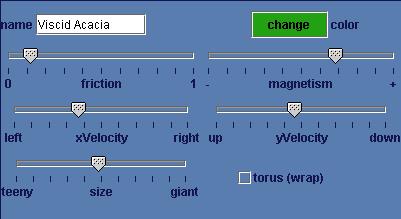
This is the disc control section. You use it to control the behavior and appearance of the individual discs. Any changes you make in this section only affect the currently selected disc. Each disc can have totally different settings. There are lots of controls in this section. Here's what they do:
name:
When you make a new disc it's given a name automatically. But you don't
have to keep that name! You can type a new name for the disc in this box.
color:
Press this button to change the color of the disc. When there are a lot
of discs floating around it can be difficult to keep track of which is
which. So you might want to use different colors to help keep track.
friction:
Use this slider to control how much friction the disc experiences as it
moves around in the pool. The more friction, the more the disc will
slow down. 0 means no friction, 1 means a lot of friction. If you wait long enough, a disc with friction will eventually stop moving.
magnetism:
Use this slider to control the magnetic strength and polarity of the
disc. If two discs are near each other and the both have the same
polarity (say + and +), then they will repel (i.e. push away) from each
other. But if they have different polarities (+ and -), they will be
attracted to each other. The greater the strength of the polarity, the
more the discs will attract or repel.
xVelocity:
Use this slider to control the horizontal (left to right) speed of the disc. This slider's value will change as the disc's velocity changes.
yVelocity
Use this slider to control the vertical (up to down) speed
of the disc. This slider's value will change as the disc's velocity changes.
size
Use this slider to control the size of the disc.
torus:
Check this box to make the disc wrap around to the other side of the pool
when it hits a wall. Uncheck the box to make the disc bounce back when it
hits a wall. Remember that each disc gets its own torus setting, so if you want all of the discs to behave in the same way you need change their torus settings one at a time.
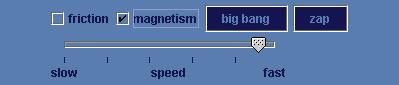
This is the master control section. The controls here affect all of the discs at once. Here's what they do:
friction:
Check this box to turn friction on. When friction is on discs will slow
down over time. The speed at which they slow down depends on their
individual friction settings. Uncheck this box to turn friction off.
magnetism:
Check this box to turn magnetism on. When magnetism is on discs will be
attracted/repelled depending on their individual magnetism settings.
Uncheck this box to turn magnetism off. If you have friction on and the discs have gotten pokey, turning on magnetism will often give them a little new energy.
big bang:
Press this button to stack all of the discs on top of each other in the
center of the pool. Make sure that magnetism is turned on when you to
this. Then you can watch as they struggle to find their way out of the
mess!
zap:
Press this button to give all discs a zap of energy. They'll go sliding off in random directions. This is useful when friction or magnetism have caused the discs to slow down or get stuck together.
speed:
Use this slider to change the overall speed of the discs. Depending on
the speed of your computer, the graphics may seem to be a little too slow
or a little too fast. You can use this slider to make the speed just
right.
play/pause:
Use this button to stop and start the action!
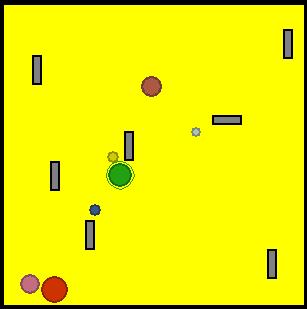
This is the pool that the discs float on. Click on the pool. See what happens? A grey wall is added to the pool. You can use these walls to build paths and mazes and barriers for the discs to bounce off of. Here's how the walls work:
make a wall:
Click in an empty spot in the pool and a vertical (up and down) wall will
appear.
rotate a wall:
If you click on an existing wall, it will rotate.
move wall:
delete wall:
This may sound a bit complicated, but just play with it for a minute and
you'll see that it's really pretty simple!
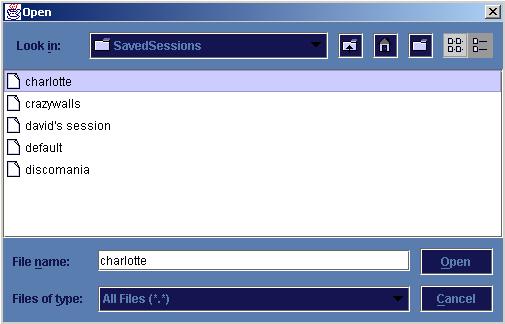
Once you have configured the pool in an interesting way (maybe you've made some patterns with the walls, or you have a set of discs that work well together) you can save the configuration in a session file by choosing "Save Session" from the file menu. Later you can reload that session by choosing "Open Session" from the file menu. You can save as many sessions as you like. When you launch disc-o-master it looks for a session called "default" and loads that as the initial configuration. If you want to save one of your own sessions as the default configuration, just save it with the name "default".
If you hold down the control key
If you click on a horizontal (left to right) wall it will be deleted. To
delete a vertical wall, click on it once to make it horizontal and then again
to delete it.
Opening and Saving Sessions:
Activities
See the activities page for some suggestions for using disc-o in the classroom.